Kalman FAT Suite — Workflow and User Manual
A practical guide to project setup, roles, multi-phase sessions, independent participant decisions and controlled FAT/SAT execution.
PDF user manuals
PDF editions include contents, page numbers and the illustrated instructions. Choose a language above to download its edition.
Kalman FAT Suite organizes industrial acceptance testing without forcing several people to share and overwrite one decision. The permanent project hierarchy and each phase-specific test session are kept separate.
The core hierarchy is Project → Test Area → Test Package → Test Item. A session adds the testing context: phase, lifecycle state, assigned participants and each participant's independent response.
This manual describes the current product behavior. Where participant reporting is still separate from the established PDF workflow, that limitation is stated explicitly.
Start with these six steps
Follow this route for your first project. Each card opens the relevant instructions.
- Create and prepare a projectFrom My projects, use Create a new project, choose demo or blank, then enter the name and optional customer and submit the setup form. Add items on the website or import the Excel template.
- Assign responsibilitiesInvite members and set each person's access for the phase.
- Open a test sessionSelect the phase and review participants before opening.
- Record your responseSave your own decision and technical comment; check confirmation.
- Resolve findingsReview differences, track corrective action and run a retest.
- Review and hand overConfirm shared results and prepare the PDF report.
What you can do
End-to-end workflow
- Create a project: Start with a blank project for your own test scope, or use the demo to learn with sample data.
- Define project information: Identify what is being tested and for whom. Add the project number, customer, plant or unit, system and location, then record the preparer, date and document revision. These details identify the project in your reports.
- Define project members: Add the people who will manage, test or review this project. Project roles control access to settings and the test structure. Members sign in using the email you add; assign their responsibilities for each phase in the next step.
- Define phases and member roles: Create a draft phase for each test stage or session. Assign at least one Phase Admin, select Testers and Viewers, and identify required responders. A person's phase role can differ from their project role. Review and save assignments while the phase is still in draft; start testing in step 7.
- Add reference document list: Record each document's title, number, revision and availability so everyone uses the same agreed test basis. For example: an I/O list, control narrative, electrical drawing or FAT procedure. This is a document register; add document files as attachments in the relevant test area or package.
- Define the test structure: Use three quick stages: organize areas and packages, define the test items, then review the scope. Each item needs an identity, test instructions and an expected result or acceptance criterion. Save and add another builds repeated items quickly. You can also import Excel. Incomplete drafts are allowed; this review checks definitions, not testing results or acceptance.
- Activate a phase and perform tests: Select the phase you want to run, verify its members and start it to change its status from Draft to Open. Open a test package and record each participant's own decisions, comments and evidence. Record deviations as punch items. Repeat for each phase; the selected active phase determines where participant decisions are saved.
- Review project results: Review the project summary, then inspect results in each phase and package. Follow up on failed or blocked items, unfinished tests, required participant responses and punch items. The absence of critical blockers alone does not mean testing is complete. Close a phase once its review is finished to make participant results read-only.
- Create reports: Choose Shared project results or the live or archived phase to report, then select a report profile and review results, participant decisions, references, comments and evidence. Check document number, revision, preparer and sign-off details in Report settings, plus attendance and report notes. Preview the report before printing or saving it as a PDF. Data tools also exports the project workbook.
 View full image (opens in a new tab)
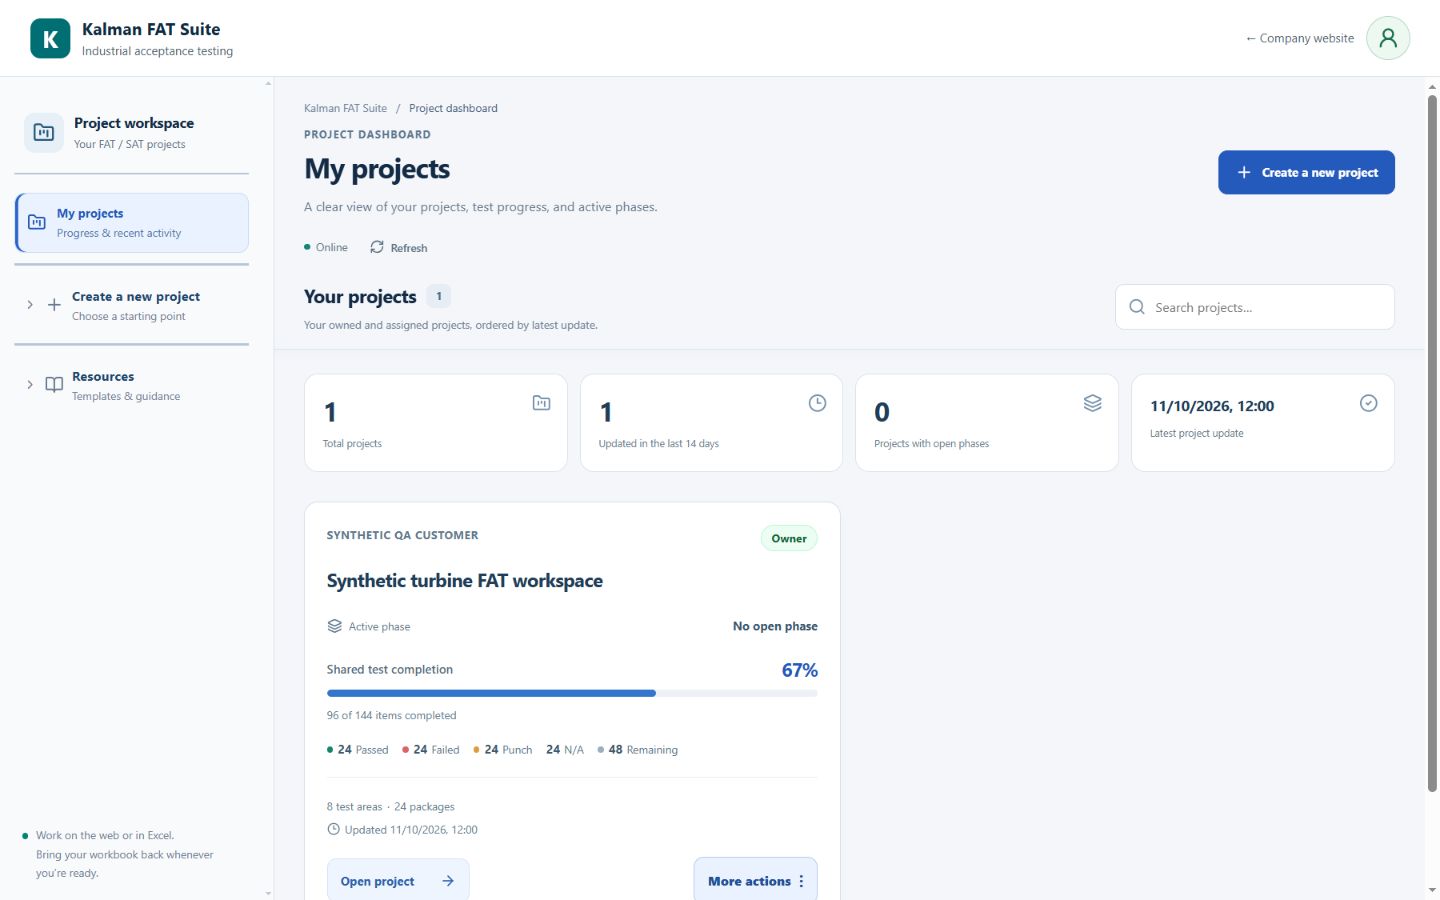
My projects opens the project list directly. The main Create a new project button opens the demo/blank chooser. Sidebar Create a new project and Resources start closed; opening one closes the other. Expand them for direct setup links or the Excel template and manual. Project cards show progress and phase information.
Example project; the interface in these screenshots is in English.Project and testing structure
| Project | The durable project container for scope, members, references, report settings and all test phases. |
|---|---|
| Test Area | A major plant, system or discipline grouping. |
| Test Package | A manageable group of related checks inside an area. |
| Test Item | The individual IO, HMI, alarm, sequence, communication, cabinet, cybersecurity or document check. |
| Phase Session | A controlled round of testing with its own phase, participants, lifecycle and responses. |
| Participant Response | One person's decision for one test item in one session. It is stored independently from every other participant and from the shared legacy result. |
 View full image (opens in a new tab)
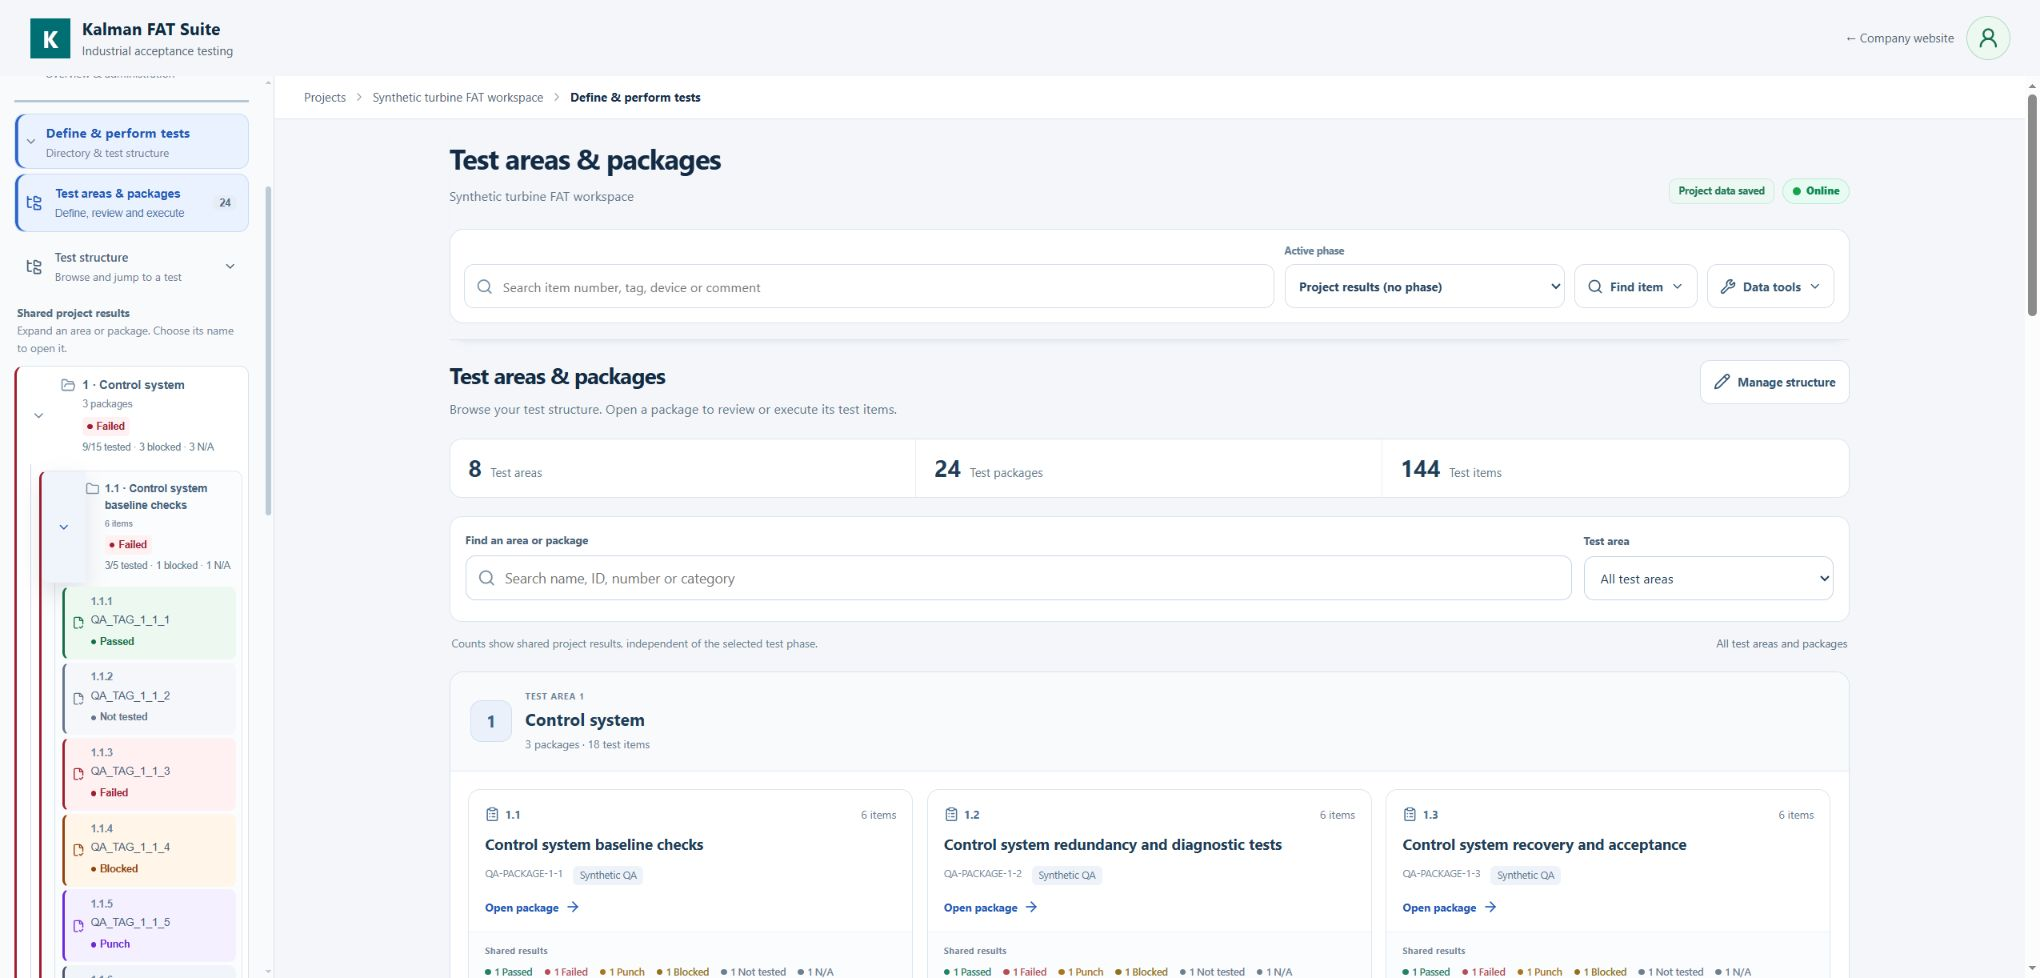
Define & perform tests → Test areas & packages opens this grouped directory in the main pane. Search or filter areas and packages, review shared result counts, or open a package to work on its tests.
Example project; the interface in these screenshots is in English.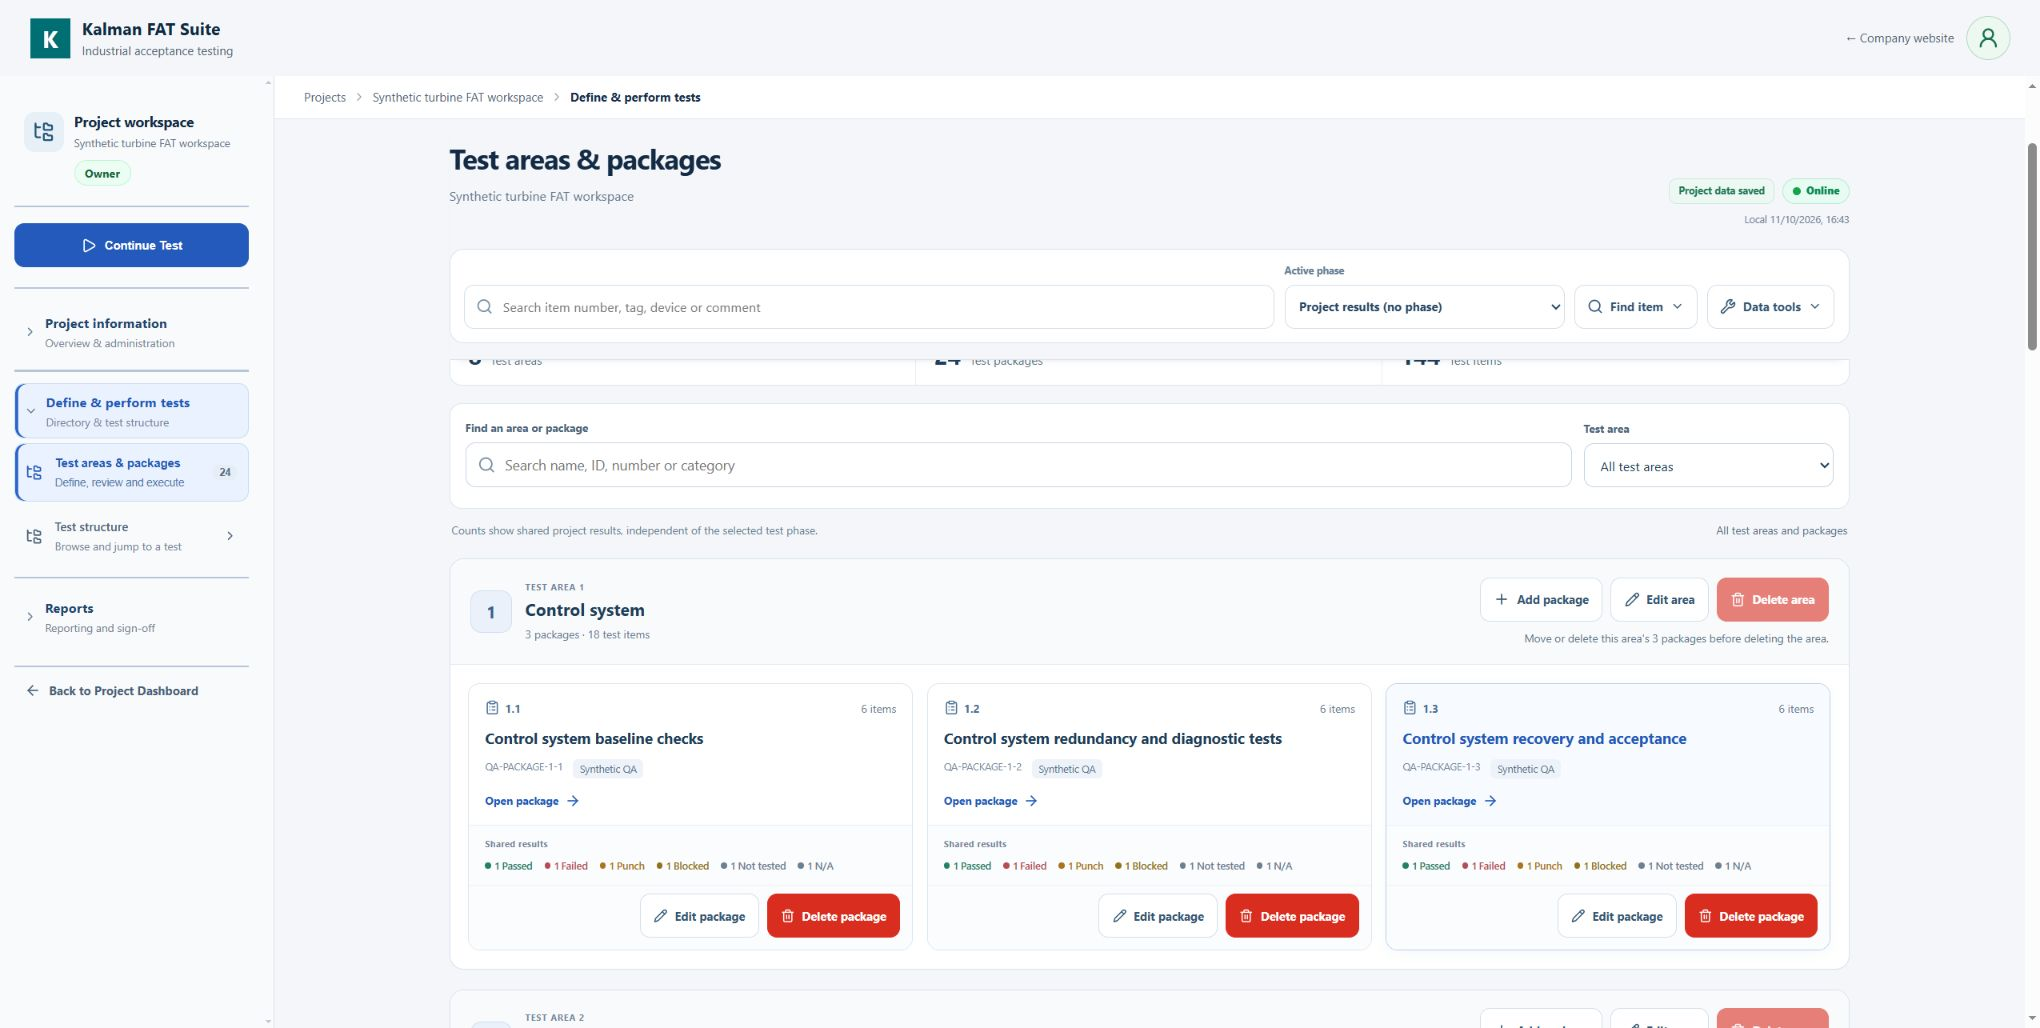 View full image (opens in a new tab)
Manage structure reveals Add test area, Add package and the editing/deletion controls. Delete area stays disabled while packages remain, with an explanation. Done returns to browsing.
Example project; the interface in these screenshots is in English.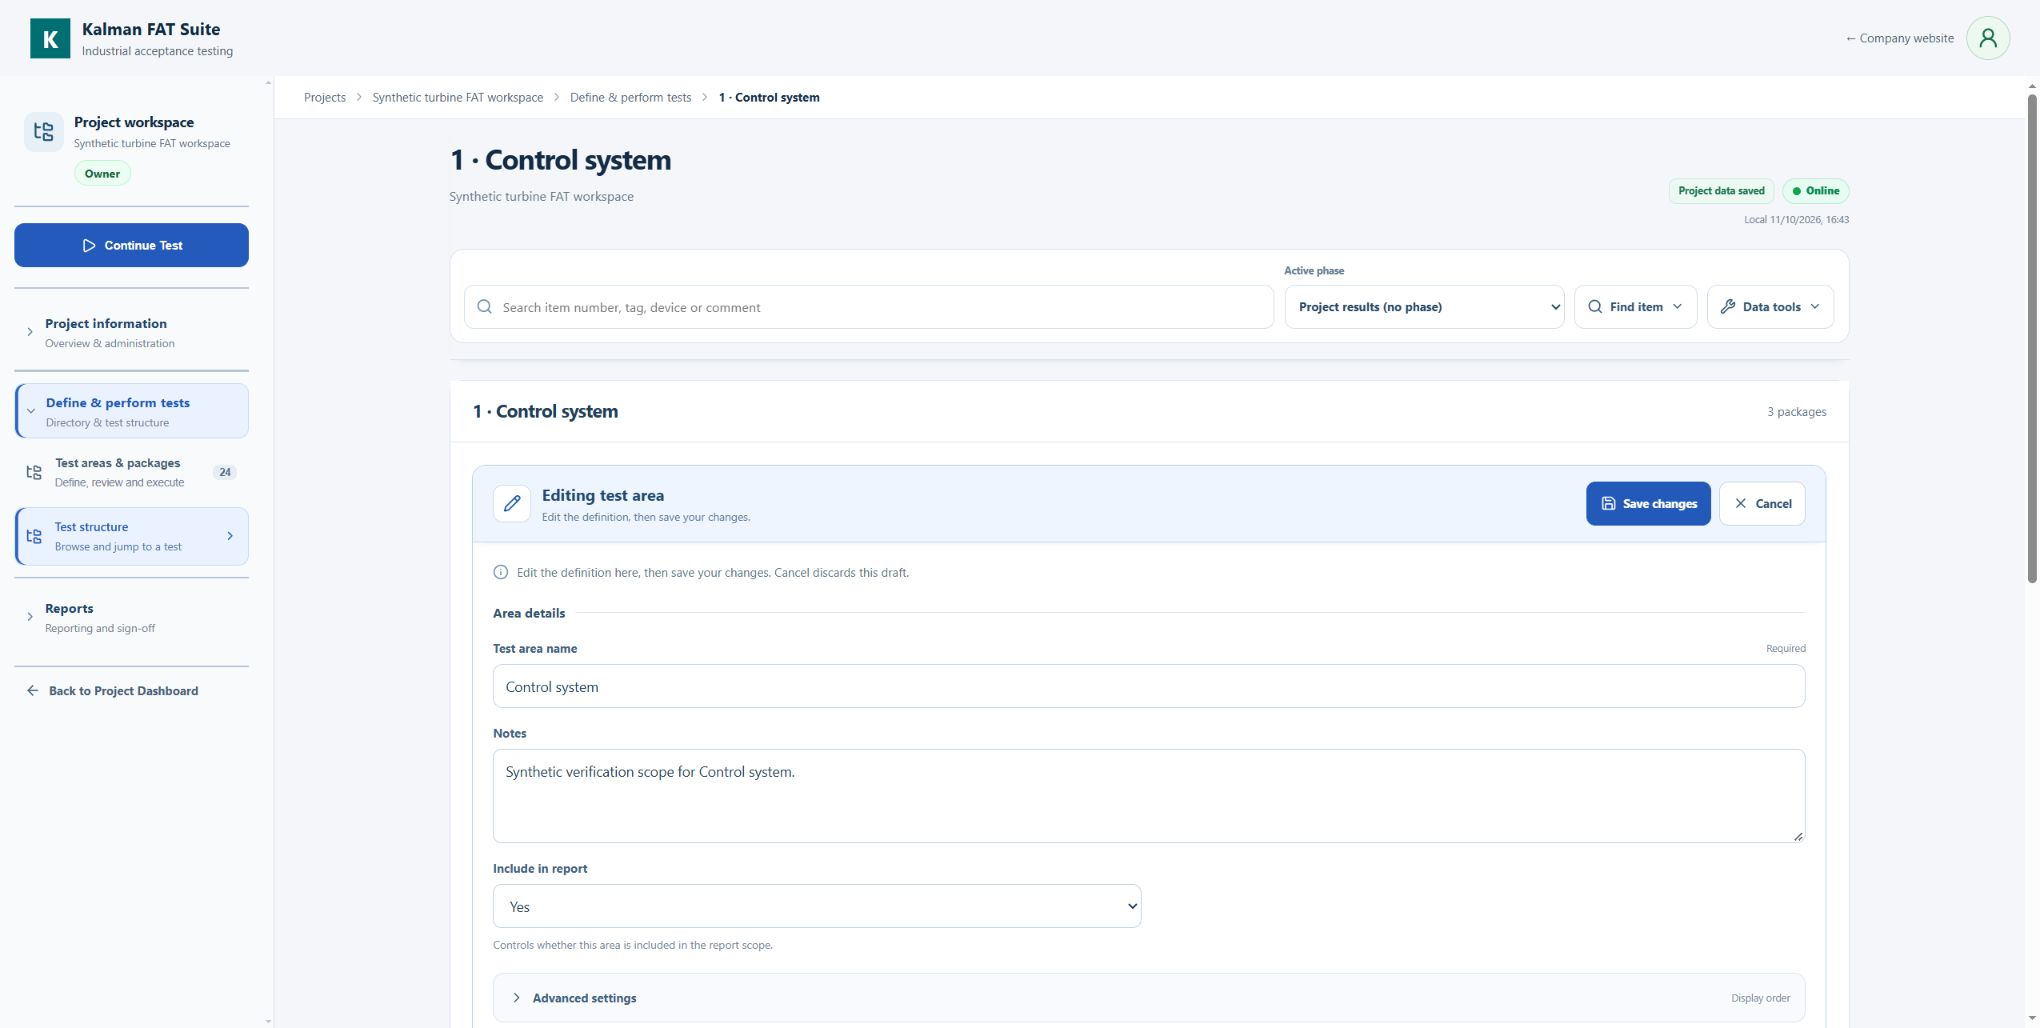 View full image (opens in a new tab)
Edit area opens Area details and Advanced settings. Save changes applies the definition; Cancel keeps the saved fields. Attachment changes save immediately.
Example project; the interface in these screenshots is in English.Phases and session lifecycle
| Phase types | Internal, Pre-FAT, FAT, SAT, Punch Retest, Final Acceptance and Custom describe why and when the session is performed. |
|---|---|
| Draft | Owner/Admin prepares the name, phase and participant list. Responses are not accepted. |
| Open | Assigned responders can submit their own responses. The project Owner or this phase's Admin can add project members; existing roles, required flags and results stay unchanged. Newly required Admins or Testers are Pending until they respond; Viewers are excluded. |
| Closed | All responses are read-only. The project Owner or this phase's Admin can reopen with a reason and confirmation. Results and response history remain; who reopened it, when and why are recorded in project access history. |
| Archived | The session remains permanently read-only in project history and cannot reopen. Usual lifecycle: Draft → Open → Closed → Archived; Closed may reopen to Open with a recorded reason, and Draft may also be archived. |
Phase-specific access
| Project role | The permanent Owner, Admin, Tester or Viewer role controls project settings, hierarchy, imports, members and general project access. It does not automatically decide a person's role in every phase. |
|---|---|
| Phase Admin | Manages the selected phase's Draft access list, adds participants while Open and manages its lifecycle, including a reasoned reopening of Closed. Can save their own response without gaining permanent project-administration rights. |
| Phase Tester | Can open the phase and save or update only their own decision for each test item. Testers cannot edit another person's response. |
| Phase Viewer / No access | A Viewer can review the phase but cannot respond and is never counted as Pending. No access means the phase and its responses are not visible. The Project Owner retains an emergency governance override for all phases. |
| Required responder | Only a Phase Admin or Tester can be required. Their item remains Pending until they save a decision; Phase Viewers never enter completion totals. |
Access, roles and responsibility
Project access is assigned by email and enforced in the database.
Project membership and phase access are separate: the same person can be Admin in Pre-FAT, Viewer in FAT and have no access to SAT.
Roles
| Owner | Project creator with full control over structure, settings, members, import/export and deletion. The Owner cannot be removed or downgraded by an Admin. |
|---|---|
| Admin | Manages structure, settings, reports and members. Cannot delete the project or change/remove the Owner. |
| Tester | Executes assigned tests and records their own participant responses. Cannot manage project structure, settings, imports or members. |
| Viewer | Read-only project and report access. Cannot execute tests or change project data. |
Access management
- Owner/Admin invites members and changes permanent roles from Project information → Project members.
- When a phase is Draft, the project Owner or its Phase Admin assigns project members as Admin, Tester, Viewer or No access. While Open, they can only add unassigned members; existing assignments remain protected.
- Adding a project member does not automatically give phase access. Use Add participants in Phases & Roles. Newly required Admins or Testers start Pending; Viewers never count as responders.
- Required responder marks whose answer is expected; it does not silently create or consolidate a decision.
- The Owner record is protected and access changes remain auditable.
Security rules
- A participant may create or update only their own session response.
- One tester cannot edit another tester's decision, comment or response record.
- Owner/Admin manages the session and may review all permitted responses, but participant authorship remains separate.
- Visibility of other participants' responses follows the session access policy; users without project access cannot open the project by URL.
Offline and revoked access
- Previously authorized project drafts can remain on the same device and browser while offline.
- Revoking access does not remotely erase browser storage immediately, but the server rejects later synchronization without permission.
- Participant-session responses currently require a successful online save; do not assume an unsaved participant decision has reached the server.
Workspace navigation
- Creating a project opens step 2, Project information. Existing projects open their review. The left pane follows the nine-step workflow: Define the project (1–6), Run testing (7), then Review and reporting (8–9). Project overview is in step 8. Each main step offers Previous and Next; Project workflow returns to the selected step. Area and package links remain available for detailed work.
- Test areas & packages opens a directory in the main pane. All areas are grouped with their packages, item counts and shared results. Find an area or package searches names, IDs and categories; the area filter narrows the directory. Clear filters to show the complete structure again.
- Test structure expands the area, package and test-item hierarchy in the left menu. Use the arrows to expand or collapse branches. Selecting an area or package name opens its page; selecting a test item opens its package and testing panel. These shortcuts browse existing tests without enabling definition editing. Project access and phase permissions still apply. The tree shows Shared project results independently of the active phase. Colours and labels distinguish Not tested (gray), Passed (green), Failed (red), Punch (purple), Blocked (amber) and N/A (slate). Area and package colours summarize status, including blue In progress. Their tested count includes Passed, Failed and Punch; N/A is excluded from the total, and Blocked/N/A counts appear separately. Progress does not confirm acceptance.
- Owner/Admin chooses Manage structure to reveal Add test area, Add package, Edit and Delete actions. Done returns to browsing. Adding an area or package opens a definition form; complete the required fields and confirm Create area or Create package. The new entry opens its own page. Only Project Owner/Admin can edit definitions or import Excel; Tester and Viewer can browse but cannot use these actions. Phase Admin alone does not grant these project rights.
- Open an area or package, then use Edit area or Edit package near the page header. The forms group names, references, procedure, report inclusion and advanced settings. Package editing reveals Add test item and Edit item / Remove item on each row. Open an item and choose Edit item at the panel top for its definition, procedure, acceptance criteria and engineering fields. Finish the current draft before opening another editor.
- Create area, Create package or Create item confirms a new entry. Existing definition edits remain in a draft until Save changes. When there are unsaved changes, Cancel or leaving the editor offers Save changes, Discard changes or Keep editing. Discard changes abandons that draft only. Recorded results, comments and evidence remain separate from definition editing; phase permissions still govern test execution. File additions and removals save separately as you make them, so Cancel does not undo attachment changes. Check the save confirmation before leaving.
- Delete area is unavailable while the area contains packages: move or delete them first. Deleting a package also removes its test items, recorded results and attachments; Remove item removes that item's result and attachments. Read the named confirmation carefully. These removals cannot be undone; export a backup before deleting data you may need.
- The breadcrumb remains at the top while you scroll on desktop, tablet and mobile. Use the project, Define & perform tests and area links to return to the corresponding level. Browser Back/Forward and reloading retain the selected page. Direct links open the selected page and still require project access.
- On desktop and tablet, the left menu and main content scroll independently. On mobile, Navigation opens the drawer. Expanding a menu group or tree branch keeps it open; choosing Test areas & packages or an area, package or test item closes it and opens the content. Cards and creation/edit forms adapt to the screen width. Search, Active phase, Find item and Data tools remain available above the content.
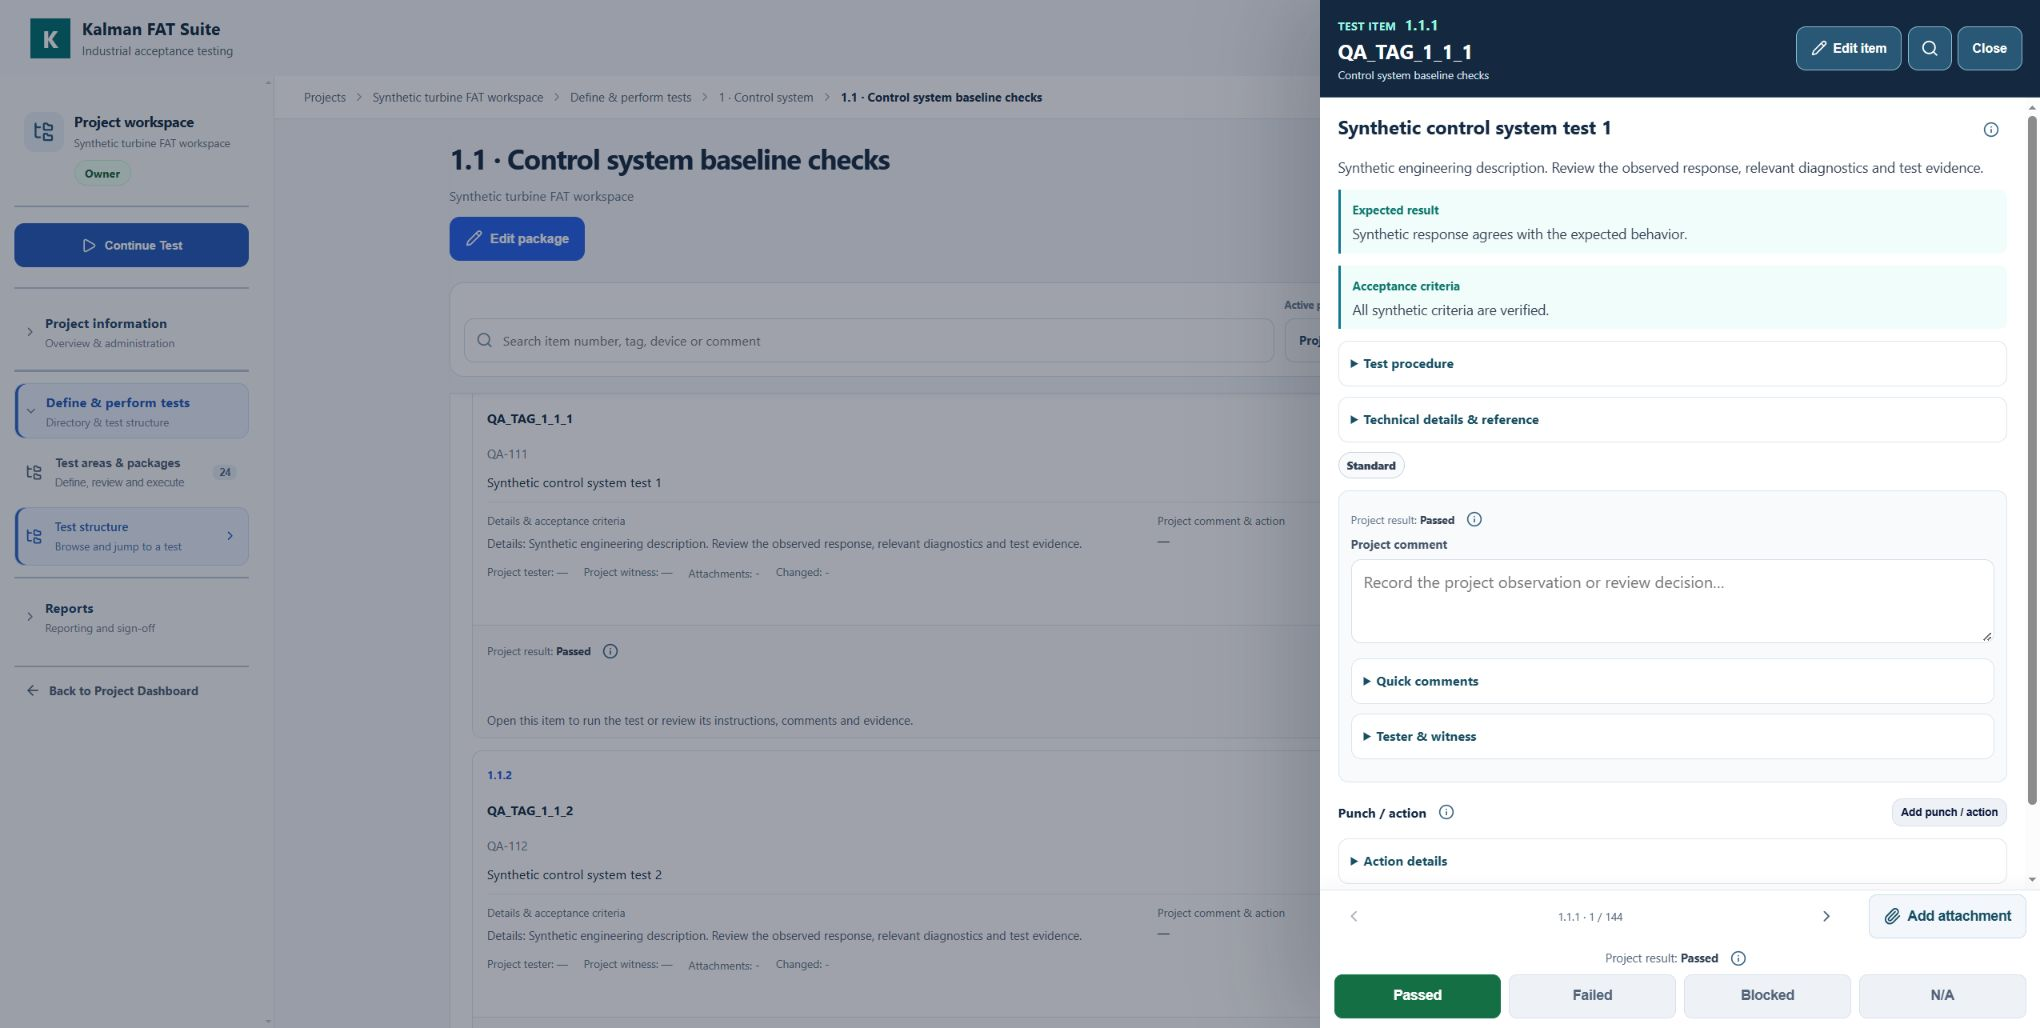
- Opening and closing a test item keeps your position in the package list; switching packages or pages starts at the top. The open item has previous/next controls and Go to item. Results save independently from the shared project data; check each save confirmation before leaving. Temporary menus close with an outside click or Escape.
 View full image (opens in a new tab)
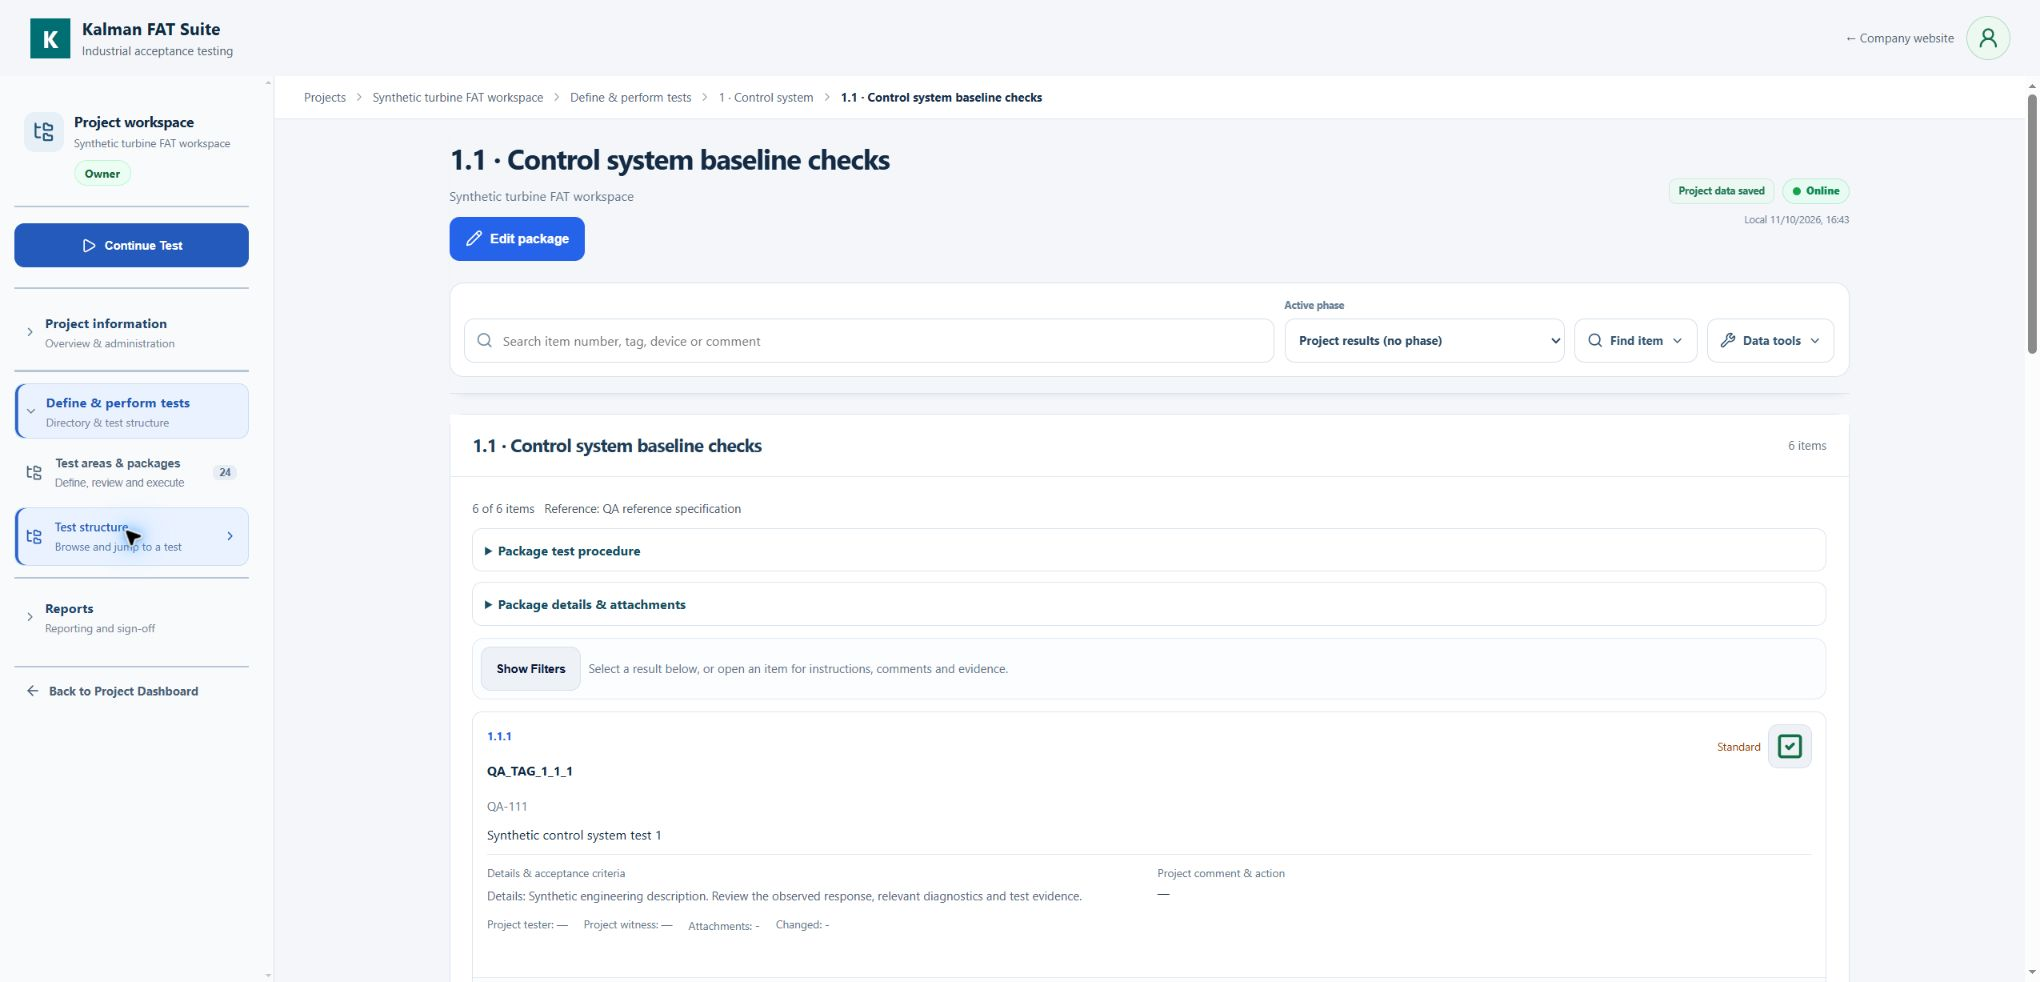
Opening a package shows its test items. The breadcrumb stays above the content. Package details & attachments shows package information and files; an item's title or play/checked button opens the testing view.
Example project; the interface in these screenshots is in English.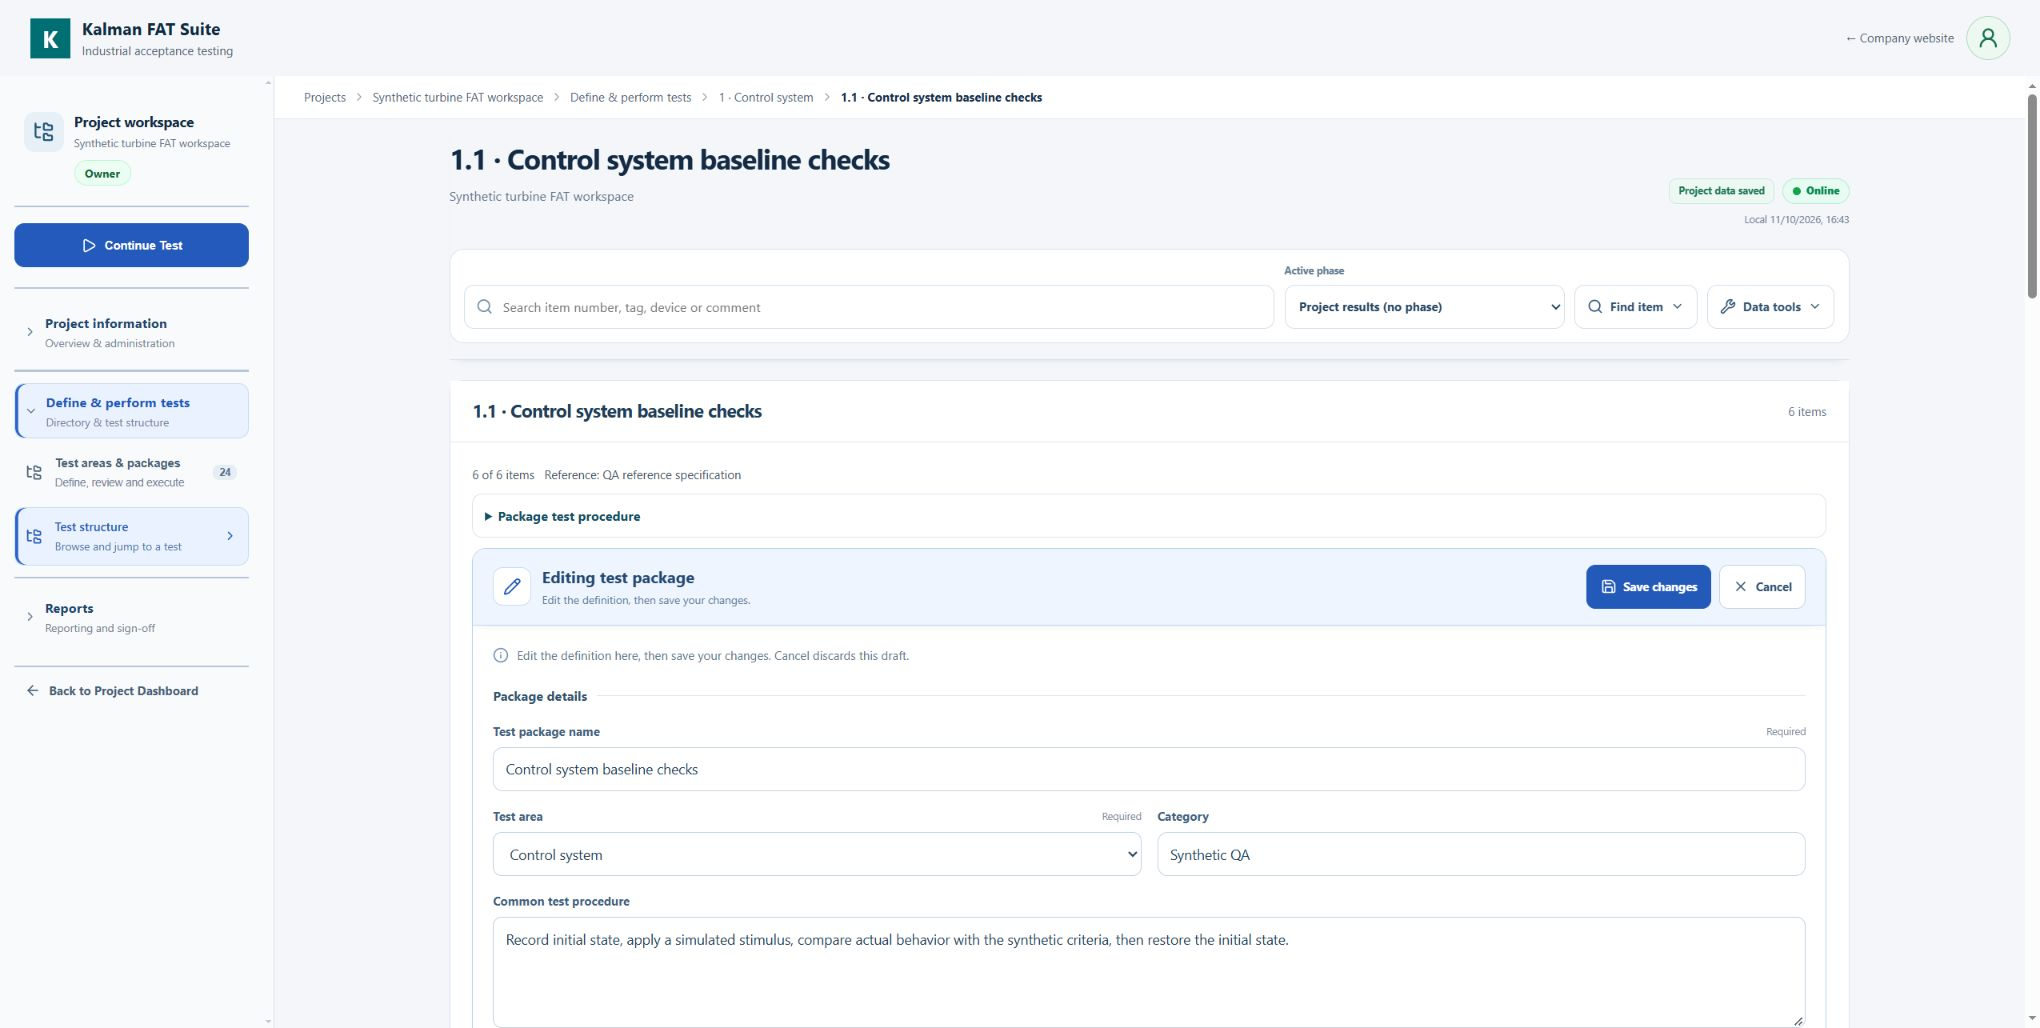 View full image (opens in a new tab)
Edit package opens Package details and reveals Add test item, Edit item and Remove item. Saving definition changes preserves recorded results, comments and evidence.
Example project; the interface in these screenshots is in English.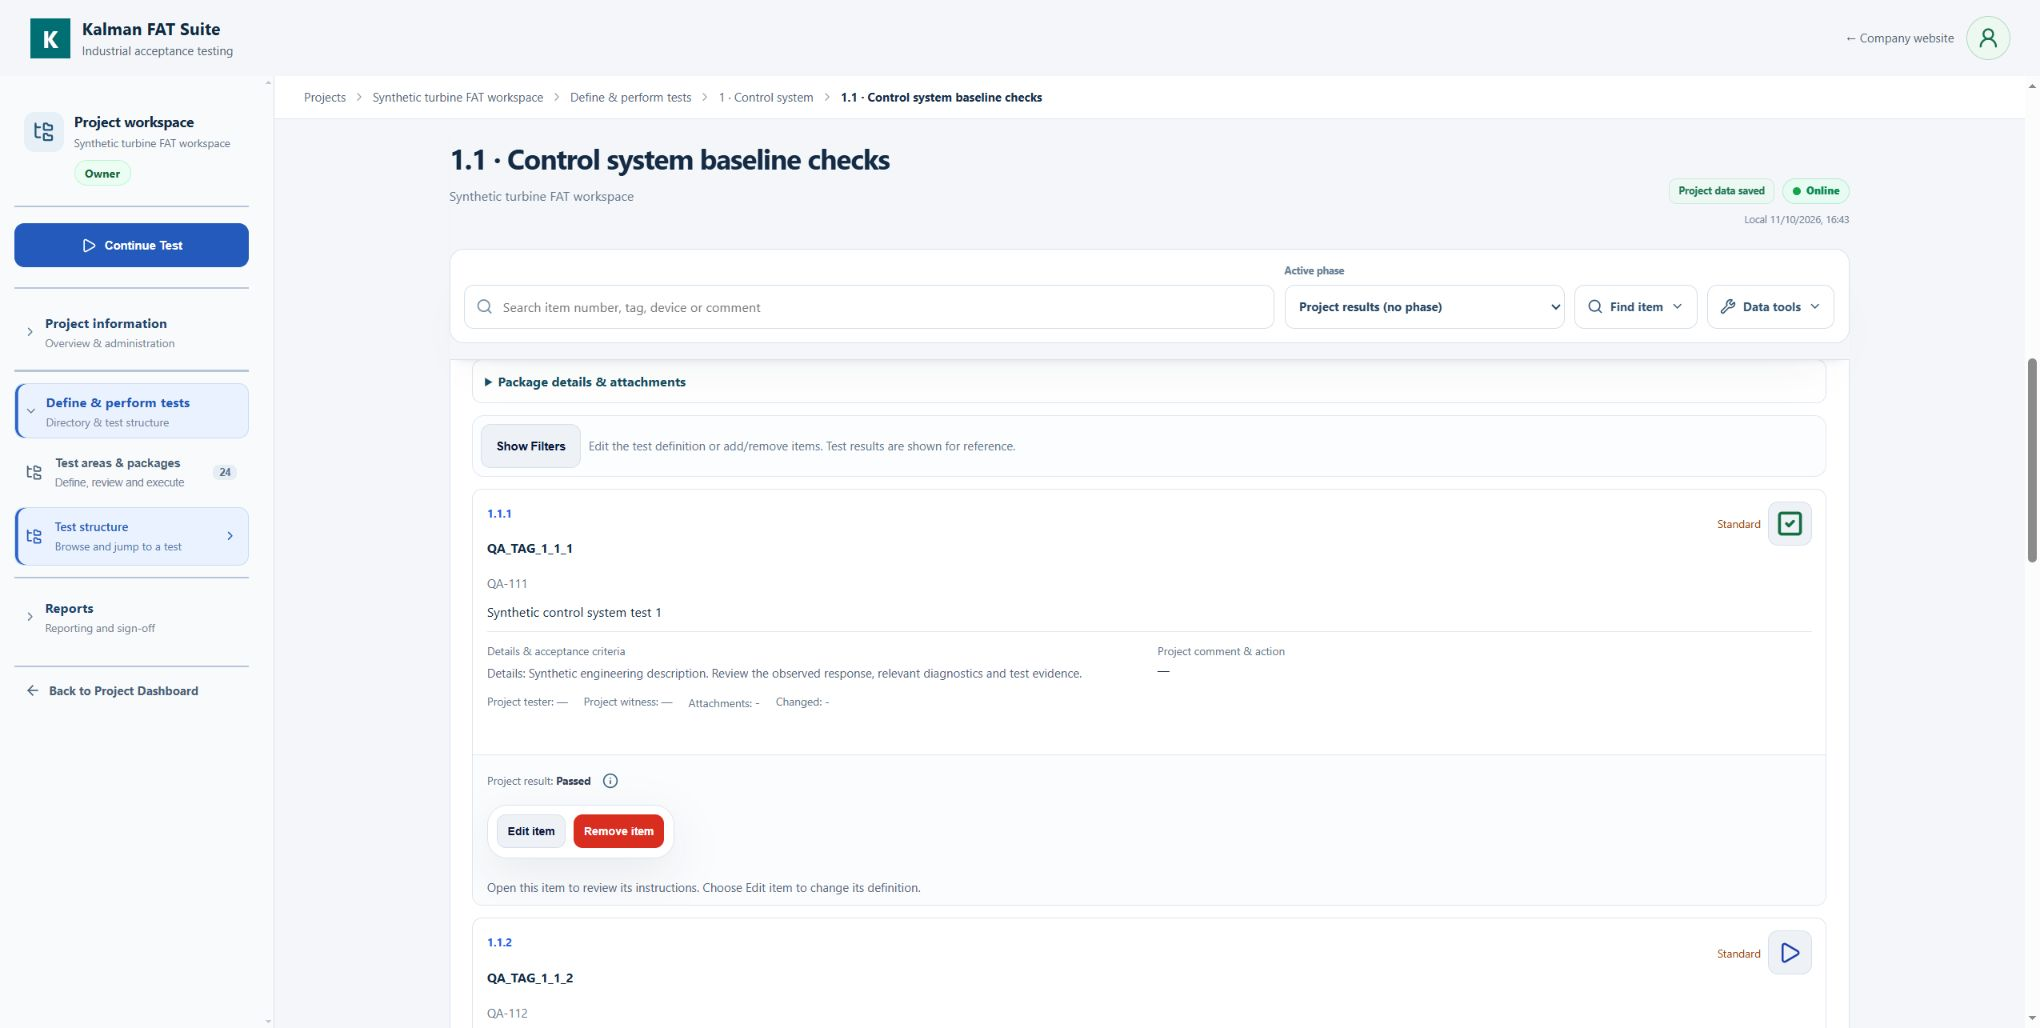 View full image (opens in a new tab)
Only Owner/Admin sees the structural Edit item / Remove item row controls while editing a package. Recorded results remain visible for reference.
Example project; the interface in these screenshots is in English.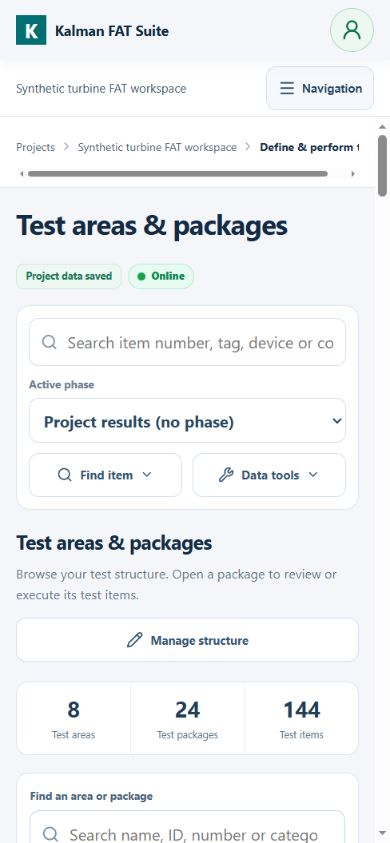 View full image (opens in a new tab)
Package cards fit the narrower screen and the breadcrumb remains at the top while scrolling. Open Navigation → Define & perform tests, then Test areas & packages for the directory or Test structure for the browsing tree.
Example project; the interface in these screenshots is in English.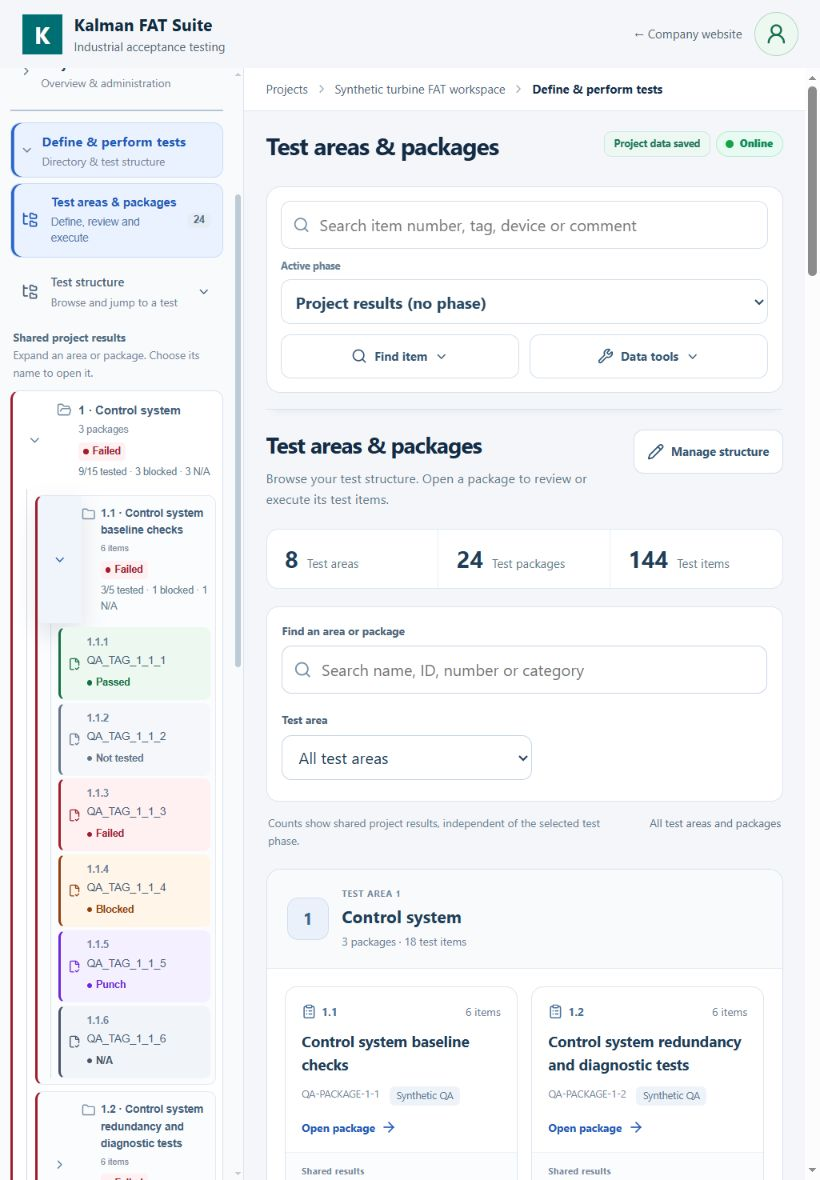 View full image (opens in a new tab)
The menu stays beside the directory and the breadcrumb above the content. Expand Define & perform tests for Test areas & packages or the Test structure tree. The tree shows colored status labels and area/package progress counts for Shared project results; its links open pages in browsing mode.
Example project; the interface in these screenshots is in English.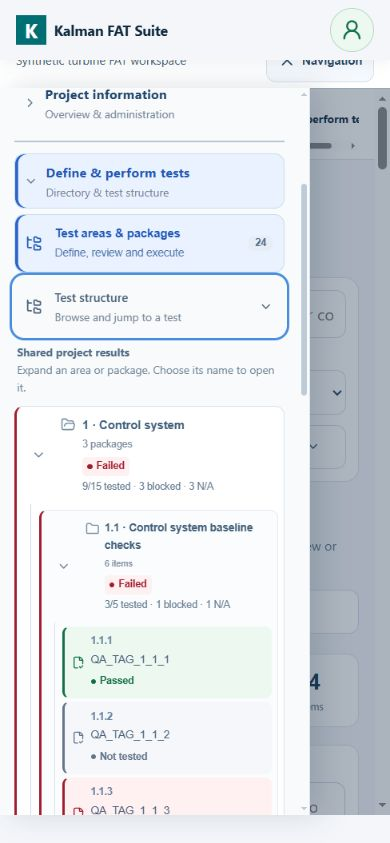 View full image (opens in a new tab)
Navigation opens the drawer. Expand Define & perform tests for Test areas & packages or the Test structure tree with colored status labels and area/package progress counts for Shared project results. Expanding/collapsing keeps the drawer open; selecting an entry opens it in browsing mode and closes the drawer.
Example project; the interface in these screenshots is in English.Independent decisions and counts
- Responses are uniquely separated by project, session, participant and test-item ID.
- An assigned participant is Pending until they save a status for that item. Their saved status is then counted immediately in the item summary.
- Choose Passed, Failed, Blocked or N/A. Pending/Not tested means no result is selected; it is not a separate result button. Click the selected choice again to clear your response, leaving all choices gray.
- A result choice saves immediately. Comments save when you leave the field, or when navigation flushes pending text. Wait for the item's save confirmation; the Project data saved header describes shared project data only.
- If saving fails, the interface restores the last server-confirmed value and shows an error. Refresh the responses before trying again.
- Two testers may review each other's responses only when visibility permits, but neither can write the other's decision.
- Selected results use green for Passed, red for Failed, amber for Blocked and gray for N/A. Read the label as well as the color. A play icon opens an unrecorded item; a checked square means a result was recorded, including Failed or Blocked, rather than that the test passed.
- With an active phase, Your result and the opening icon show your own response in that phase. Project result is the separate shared outcome; neither your response nor the team counts change it automatically. Without a phase, result buttons edit the Project result directly.
- Dashboard completion counts shared Passed, Failed, Punch and N/A records; Not Started and Blocked remain open. This is separate from phase participant completion and final acceptance.
 View full image (opens in a new tab)
Review the test details, record the observed result when permitted, and use the item navigation to continue. Close the item to return to your place in the list.
Example project; the interface in these screenshots is in English.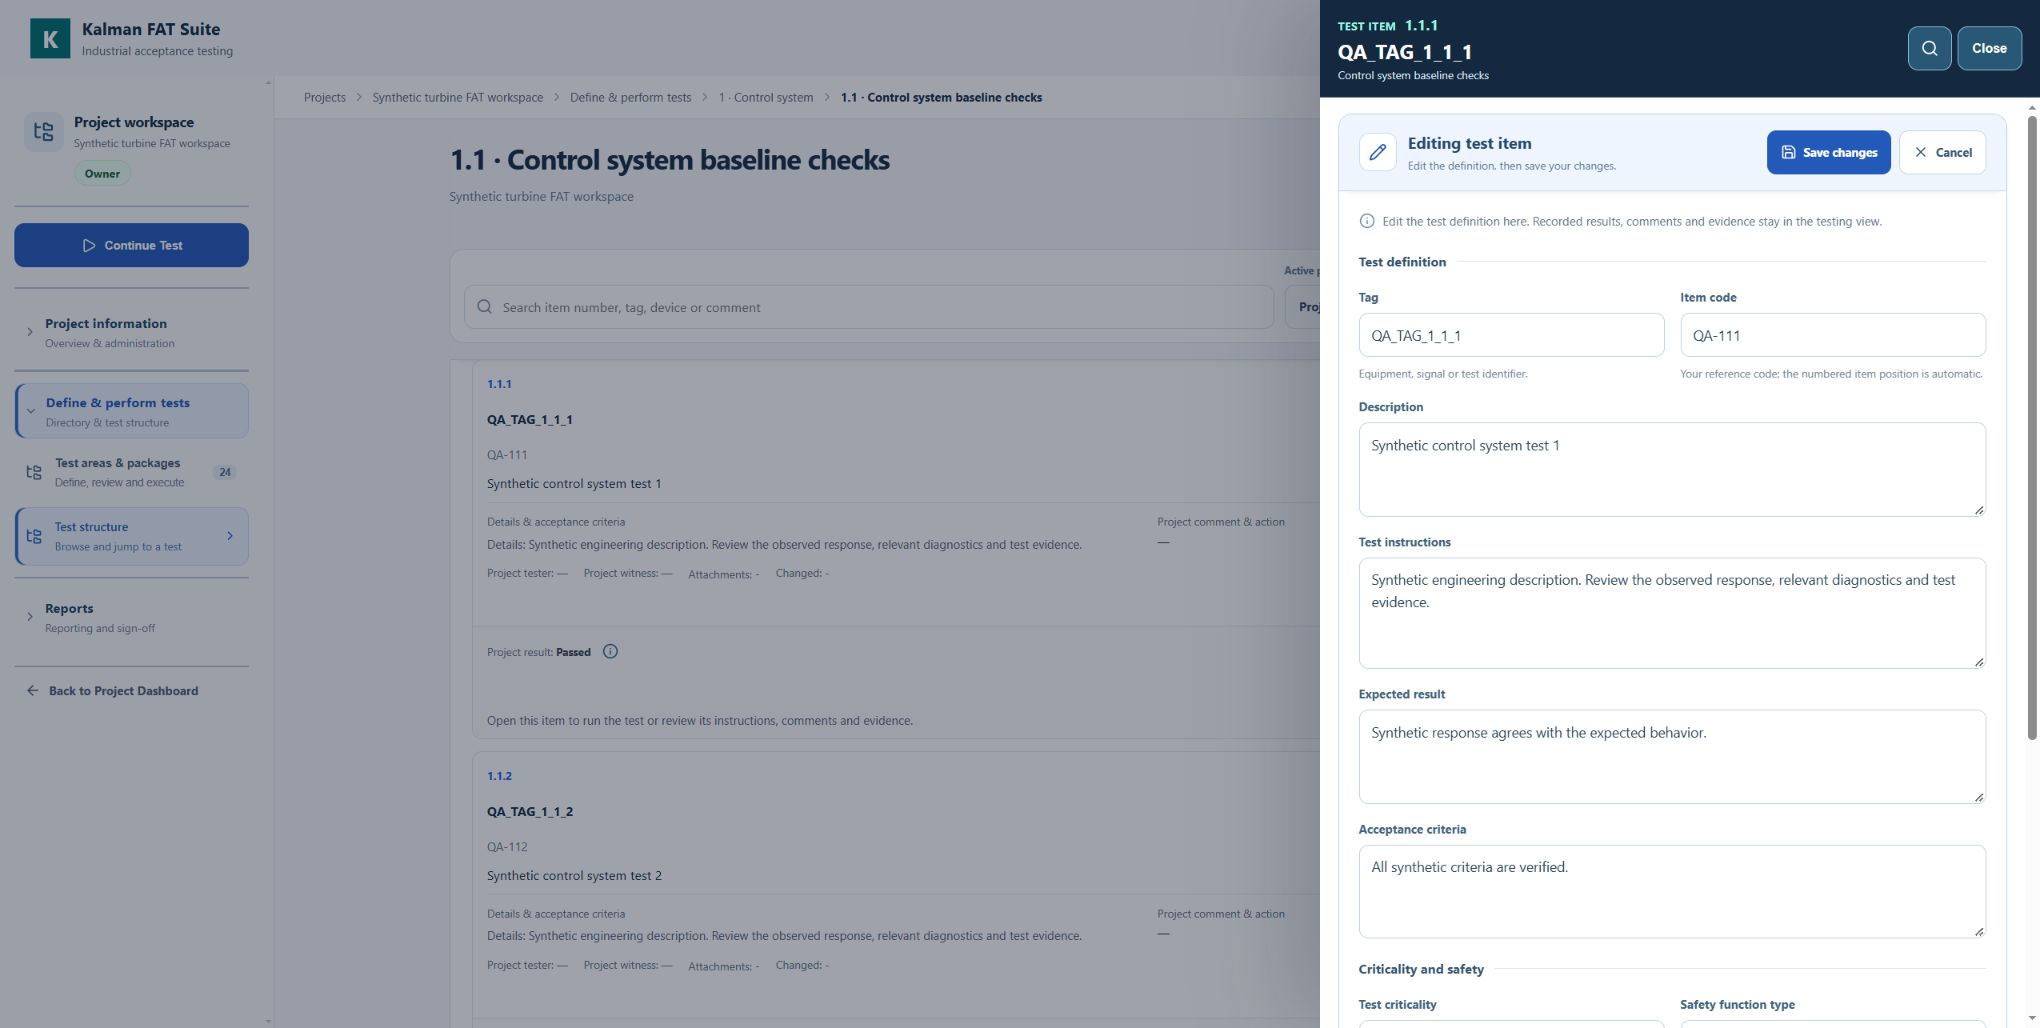 View full image (opens in a new tab)
Edit item opens a form with Test definition, Criticality and safety and Advanced settings. Save changes applies the definition; Cancel keeps saved fields. Results, comments and evidence remain in the testing view.
Example project; the interface in these screenshots is in English.Participant status legend
| Pending | The assigned participant has not saved a decision for this item in the active session. |
|---|---|
| Passed | The participant accepts the tested item for this session. |
| Failed | The participant does not accept the tested result and expects correction or retest. |
| Blocked | A prerequisite, document, configuration or condition prevents the participant from completing the test. |
| N/A | The participant records that the item is not applicable in this session. |
Shared test criticality
Criticality belongs to the shared project test item and remains part of the established readiness/report logic.
| Standard | Normal FAT/SAT verification item. |
|---|---|
| Important | Important for operation, quality, documentation or handover. |
| Critical | A Failed or Blocked shared result blocks final report readiness. |
| Safety Related | Functional-safety item such as ESD, PSD, F&G, trip, permissive or interlock. |
| Cybersecurity Critical | OT-security item that must be accepted before final readiness. |
Results and reporting
- The item panel and list show team counts for the active phase. Pending counts assigned testers and phase admins who have not selected a result; viewers are excluded.
- Participant responses are retained separately by phase and person, including revision history at database level.
- Project progress uses the project result. Reports retain project results alongside the selected phase's independent decisions and unresolved differences.
- Before issuing the PDF, an authorised reviewer should complete the project's agreed review and use Review project result to confirm the project outcome without altering participant records.
- For the project report, use A3, Landscape, one PDF page per paper sheet and background graphics enabled. Review the preview and page breaks before issuing it.
Saving, connection and recovery
- Shared legacy project edits use the existing local-first save and synchronization workflow.
- Participant status buttons need an open session, assignment, execution permission and a successful server response.
- Wait for Saved before leaving the item. If an error appears, confirm connectivity and access, then retry.
- Do not clear site data before unsynchronized legacy project changes have been recovered.
Engineering tools, references and checklist configuration
Adapt the checklist to the control-system scope and approved engineering documents.
- Configure package procedures, references, visible detail fields, order and report inclusion. Record document titles, numbers, revisions and availability; attachments can be added to areas, packages and items.
- Use safety-function, SIL-relevance and OT-security fields where applicable. The Cybersecurity FAT/SAT module covers practical checks such as access control, segmentation, hardening and recovery; it is not an IEC 62443 certification.
- Use search, filters, Next open, Next failed and Next punch to find items. Review progress, criticality and cybersecurity summaries. Report profiles, logos, notes and attendance/signature fields support handover; signature fields are project records, not a certified digital-signature service.
Excel import and export
Prepare test items and procedures in the Excel template, then import the file to avoid entering each item by hand. Afterwards, an Owner or Admin can add or change items and procedures on the website at any stage.
- Download the template above, keep its sheet and column structure, and complete the project and test data. Owner/Admin can use Data tools → Import Excel. Export a backup before importing into a project with existing data; then check hierarchy, counts, references and acceptance criteria.
- At any definition step, Data tools → Export workbook downloads project information, test structure, shared results, stored attachment files and visible phase records. Continue defining items or recording shared statuses, comments and punch actions in Excel, then import into the same project. Import replaces the editable lists; review the data before continuing.
- Keep Snapshot_Data and existing identifiers intact. Phase records restore as read-only archives; import does not recreate live phase permissions, memberships or approvals. Editing the phase reference sheets does not change live decisions. Legacy attachments without stored contents remain unavailable; older workbooks without snapshots cannot restore files or phase archives.
- Owner/Admin opens Edit package near the page header, then chooses Add test item. For an existing item, use its row's Edit item or open the item and choose Edit item at the panel top. Edit package also contains the common procedure. Create item adds a new item; Save changes commits an existing item's definition; Cancel and, if prompted, Discard changes abandon the draft. The play or checked-square icon opens a test; a check means a recorded result, including Failed or Blocked. Phase access still governs execution.
Punch items, evidence and retesting
Make every finding understandable and actionable for the next reviewer.
- For Failed or Blocked, record the equipment tag, test conditions, expected and observed values, and reference in Your comment. Use Add punch / action for follow-up work, with evidence, severity, responsible person, due date and closure criteria. Your result does not automatically change the project result or create an action.
- After correction, create a Punch Retest session and record the new result there. Keep the original responses. Reconcile the shared punch list and exported Punch_List before handover.
Worked example: one item, two testers
Two required testers check a high-pressure alarm in a FAT session.
- One records Passed. The other observes excessive delay and records Failed with a technical comment. Both have responded, but the disagreement remains unresolved.
- Review needed highlights the difference. An authorised reviewer compares evidence and uses Review project result to record the project outcome under the agreed acceptance procedure. Keep the participant decisions and record a retest in a new phase. Reports include the project result and the selected phase's independent decisions.
Troubleshooting
Check the active phase, your access and the save confirmation first.
- Disabled response buttons: the session must be Open and you must be its Admin or Tester. Viewers cannot respond. The project Owner or Phase Admin can add project members while Open without changing existing access or results. Newly required Admins/Testers are Pending. Reopen phase requires a reason and confirmation for Closed; results remain and the action is recorded in project access history. Archived stays locked. A comment alone does not replace saving a status.
- Save errors: check connectivity, sign-in and project/phase permissions, then retry. Both result controls use Passed, Failed, Blocked and N/A. Click the selected choice again to leave Not tested, with all choices gray. Pending counts people who have not tested. Punch is a separate follow-up action; earlier Punch records are retained. Result choices save without opening the item; its title, play/checked-square button or Start / Continue Test opens it.
- No critical blockers does not mean all tests or required responses are complete. The PDF uses shared results; review these separately from participant counts. For clipped print tables, check A3 landscape, one page per sheet, background graphics and print scale.
- Local drafts stay with the same browser, device and site address. Before moving from the old website to kalmanfat.com, synchronize or export outstanding shared changes at the old address. Participant responses require successful online saving.
Project controls and best practices
- Define phase names, acceptance criteria and required responders before opening a session.
- Use one session for one identifiable test round; create a later session for retest instead of rewriting history.
- Require participants to record their own technical judgement and explain rejected or blocked results in comments.
- Close a session only after checking Pending, Failed and Blocked counts.
- Keep the shared final decision and the independent source responses conceptually separate.
- Verify imported data, references, criticality and report settings before formal FAT/SAT begins.